home | meat grinders | sausage stuffers | sausage casings | e-mail SausageMania | NEW! Sausage Photo Tutorial | sausageMania recipes |more SausageMania recipes | motorize a grinder | tips | links | kippermania | loxmania | NEW! PestoMania | NEW! Even MORE SausageMania Recipes! | NEW! Lox Making Photo Tutorial | NEW! CaviarMania | NEW! Porcini Sausage!
How to Make Delicious, Succulent Sausage at Home — All You Need to Know for Mouth-Watering Success!
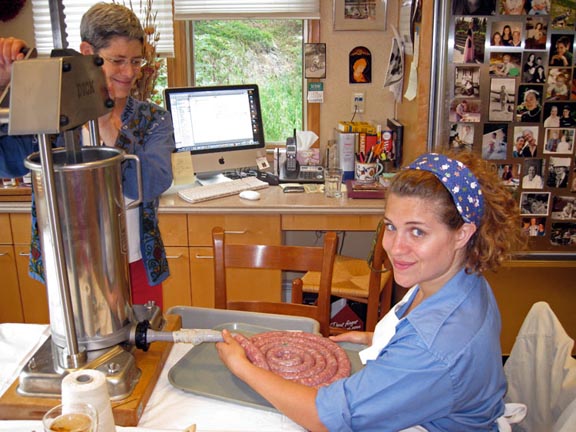
A Sausage Stuffing Session in Full Swing. YOU can do this, too, with a little practice!
SausageMania is proud to present its brand-new Sausage Making Photo Tutorial, with new text and photos to make certain you turn out perfect home made sausages from the Get-Go!
Nothing in these photos is staged — these are not slick "food studio" shots… These photos are of several real, down-to-earth, day-long sausage-making sessions done in our own kichen, not in some fancified food prep studio such as you see on TV.
You needn't spend a fortune on equipment: you can start off with small, manual meat grinder or a food processor, a basic hand funnel (essentially unchanged since ancient Roman times) for under $10.00, or a 3-lb "pump handle" push stuffer for under $50.00. The sausages you make with the least expensive equipment will be every bit as "professional" and delicious as the sausages you make with the most expensive equipment… You just won't be able to churn out 100 lbs in a single, day-long session without the fancier gear.
You'll need some supplies and some tools before you embark on your Sausage Adventure. First off, you need some pork. That's right — pork — not beef, lamb, venison, chicken, turkey or wallaby. Pork is the only meat worth using for sausage. Unfortunately, our obesity-conscious culture has made fat a dirty word, so today's pork is much leaner than the pork of yesteryear. To be decent, sausage needs at least 20% fat: with too little fat, sauage will not slice, but will crumble like dry breadcrumbs and taste like cotton. So avoid lean (but pricey) cuts, like loin, and go for the cheaper cuts. Pork shoulder, a.k.a. Boston butt, Boston blade or simply "pork butt," is one of the fattier cuts. We buy it in 70-80 lb. cartons at Costco, where the carton is sold at a slightly discounted price per pound.
Make sure to get boneless pork shoulders. The bone-in pork shoulders cost less, but then you have to bone them out, which is time consuming, plus you might just lose a fingertip in the process.
Next you need casings, not readily available either at the supermarket or specialty butcher. Quality, natural, non-artificial casings are the key to sausage making success: buy crappy casings and you'll spend all day dealing with ruptures. Avoid collagen or fibrous casings and look for genuine hog or sheep casings. Casings come hanked (like a big skein of yarn) or tubed, and are either wet-packed or dry-packed in salt.
Hanked casings are a real pain — they get knotted up with one another and are hard to run up onto the stuffing horn. So get dry-packed tubed casings, which are 10 times easier to use: soak them in warm water for at least 30 mintues, it's easy to find the end, and then flush them thoroughly with warm water: that way, you can run them up onto the sutuffing tube with no hang-ups. The best source, hands down, is Syracuse Casing Company. They sell U.S.-made hog casings in several diameters, and sell prime Australian or New Zealand sheep casings. They ship promptly and inexpensively, by Priority Mail.
Now for the spices: do NOT use those ancient spices that have been hanging around in the back of your spice cabinet since before Y2K. Get fresh spices, either from the bulk spice section at your supermarket, a local spice and tea store, or on-line. One of the best, most comprehensive spice sources is Spicebarn.com, who also ship by Priority Mail, usually in a flat-rate box to save you money.
Pork Butt, Boston Blade, Pork Shoulder…all the same. |
Tubed casings are the way to go. |
Use only the freshest spices and herbs. |
Still Life of a Motorized #22 Chop-Rite grinder |
The fabulous F. Dick stuffer! |
A Power of Pork to be cut up for the grinder. |
OK, so you've got your pork, casings and spices. Now for the tools. First, you'll need a decent meat grinder, unless you buy ground pork, which is a perfectly acceptable alternative. The advantage of grinding your own meat is: (a) it's fun; and (b) you know just what goes into it. Remember Otto Von Bismarck's famous dictum, That One Should Never be Present When Laws or Sausages are Being Made. 'Nuff said. Anyway, refer to SausageMania's Grinder Page for help in selecting a grinder suitable to your needs.
Next, unless you buy ground pork, you'll want a few good, sharp burtcher's knives to carve the pork butts into chunks and strips that your grinder can handle. Our over-powered, motorized Chop-Rite #22 grinder can handle 2-3" chunks, and churns out 400 lbs. of grind an hour with a 3/8" plate, but chances are you don't need such high-octane performance. We've used this grinder for moose and caribou, and there have been sessions where we had 500 lbs of meat to grind (one year, our three hunting partner families brought in two moose and five caribou!). In 35 years, probably more than five tons of meat have gone through this grinder!
Last, you'll need a sausage stuffer. Stuffers range from the ludicrously simple and cheap, to the absurdly expensive. We use a Fr. Dick vertical 24-lb sausage stuffer, which is the Mercedes Benz of hand-cranked stuffers. Again, use SausageMania's sausage stuffer page for guidance.
Cutting pork butt into strips and chunks. |
Grind it all up! |
Carefully measure out spices. |
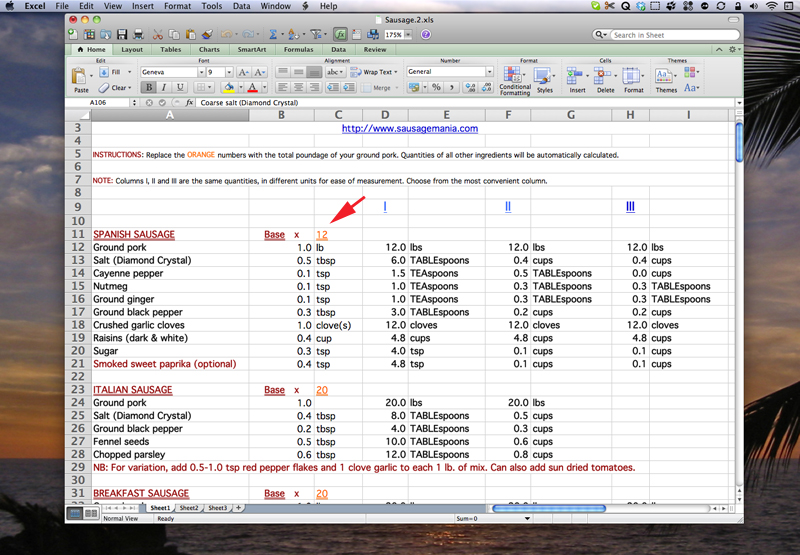
Using your super-sharp knives, cut the pork butt into grinder-size portions, then grind it all up. When you're done, you're ready to add your spices. But first, you must know the weight of the mix. Once you know the weight, use SausageMania's unique Excel™ FREE Sausage Making Automatic Ingredient Calculator to find out how much of each spice to add [You need to have Microsoft Excel™ to use this). The spreadsheet shows the quantities of each ingredient for a one-pound aliquot. Just enter your total poundage in the box with the orange number, hit "Enter" and you will instantly see all the amounts of each ingredient to add.
Here's a screenshot of SausageMania's free Excel™ spreadsheet Ingredient Calculator. Just enter the weight, in pounds, of your ground sausage mix (the orange number), and all the other ingredients will instantly be calculated. Colums I, II and III are all the same quantities, but in different units, for ease of use. For example, in Row25, "Salt," it shows 8 tablespoons, or 1/2 cup. Use the cup measurement for the larger-quantity ingredients. (Because the spreadsheet "rounds down," very small quantities, such as "Cayenne pepper" in Row 14, show up as "zero" cups.) Just use the most convenient column.
You can weigh your spices, too. |
Italian fennel sausage… |
Russian fruit sausage ingredients. |
Once you've measured or weighed out your ingredients, it's time to add the spices to the mix. This is where the work begins!
This guy is Olympic Class! |
Sausage mixing is aerobic exercise! |
And it's as messy as Hell! |
Everyone Likes to Grind Meat! |
Even Kids can Mix Sausage! |
Mixing sausage is great for an upper body workout! It's very imporant to keep mixing and mixing until there are no hidden pockets of spices left: you don't want one of your guests chomping down on a sausage filled with nothing but garlic or peppercorns!
OK, now take a break, fry up a sample patty, and see whether you want to add more of any particular ingredient.
Filling the Dick stuffer.. |
Running tubed hog casing onto the stuffing horn. |
A happy stuffing team in full swing! |
Now that you're exhausted with mixing the sausage meat, it's finally Time to Stuff! Fill the stuffer's cylinder with sausage mix, taking care to tamp the mix down all around to avoid air pockets, which can cause embarrassing little explosions of air into the casing as you stuff (after all, these are intestines you are stuffing stuff into). Once the stuffer is filled and in place, lubricate the stuffing horn with vegetable oil, and run a casing up onto it. If you're really good, you can fit 10 feet of casing on the stuffing horn, and empty the cylinder in five minutes or less!
A perfect run of big-bore Italian fennel sausage into hog casing. Note the air in the casing at the stuffing horn. |
The F. Dick stuffer can be run solo, but this takes a bit of practice and good timing! |
Grinding is simple: it's just tossing chunks of meat into a machine. Stuffing, on the other hand, takes some practice and finesse. The idea is to balance the amount of mix exiting the stuffer with the amount of casing coming off the stuffing horn. You must be careful that the casing does not get "hung up" on the stuffing horn, which is the main reason we lubricate the horn with vegetable oil.
If the mix comes out too fast, or if the casing hangs up, the casing will overfill and burst. If the casing comes off too fast, you end up with wimpy, underfilled casing. The ideal, therefore, is to let just enough casing come off to produce a decently firm sauage that can be subsequently twisted without causing a burst. Underfilled casings can be resurrected to a degree by making small links, while overfilled casing can be salvaged by making longer links (see below).
Like learning to ride a bicycle, you can read all the instructions you want, but until you actually do it, you'll never learn how!
A run of breakfast sausage into sheep casing. |
Twisting links stuffed into hog casing. |
Cutting links with scissors. |
Once stuffing is done, it's time to twist the sausage into links. This is a critical step, requiring some experience. If the casing is limply filled (a major shortcoming for novices), make short links, as the tiwsting action will firm up each link (the more you twist, the plumper the link). If the casing is tight, make longer links to avoid increasing the pressure in the casing and causing a burst link. Choose a link size and gently (and slowly) pinch the casing. Then twist the link you've just make towards you, say 4 or 5 twists. When you pinch the next link, twist away from you, so that the first link does not unravel. So it's Towards and Away, Towards and Away, until the last link. Then cut the links free for packing: don't worry, the "pinches" hold just fine after cutting.
A bin of Italian sausage ready for packing. |
Packing links into vacuum bags. |
The Vac-Master chamber-type vacuum packer. |
Your ordeal is nearly over: your finished sausages are ready for packing. If you have a vacuum packer, use it. If you don't, wrap the links tightly, first in plastic wrap and then in freezer paper. Note: if you have a chamber-type vacuum packer, such as the VacMaster shown here, chill the sausages thoroughly before packing. Otherwise the air still trapped in the sauages will get sucked out by the vacuum, taking the sausage mix with it, like toothpaste coming out of the tube! If you have a suction-type packer, this will not be a problem.
Ready for the freezer! |
Ready to Eat! |
The End-All and Be-All of Sausage Making! |
|
home | meat grinders | sausage stuffers | sausage casings | e-mail SausageMania | NEW! Sausage Photo Tutorial | sausageMania recipes |more SausageMania recipes | motorize a grinder | tips | links | kippermania | loxmania | NEW! PestoMania | NEW! Even MORE SausageMania Recipes! | NEW! Lox Making Photo Tutorial | NEW! CaviarMania | NEW! Porcini Sausage!